I’ve always found eco-dying fascinating and I told myself I’d learn more about it some day. When I stumbled upon (literally) some giant black walnuts on the ground, I immediately knew what I was going to do with them.
My first experience with black walnut dye was when I was at Penland last Summer (2018). A woman came into our classroom during open studios and we connected because of my tea bag art. She (Nicolebuzzell.com) told me I should come see the dye studio (she was the instructor) so I did! I LOVED the dye studio and before I left Nicole gave me a jar of dye and here’s what I did with it.

It couldn’t be that hard, right? To stain things? So I wanted to try it myself. I collected some black walnuts and decided to experiment.

Look how large it is!
I remember Nicole told me she didn’t use any mordant to make her dye. She just boiled it. Easy peasy.

I brought the nuts to a boil (strange smell, but tolerable) and then I let it simmer on low for an hour. I watched the color get darker and darker. I was excited and thought it might actually work!


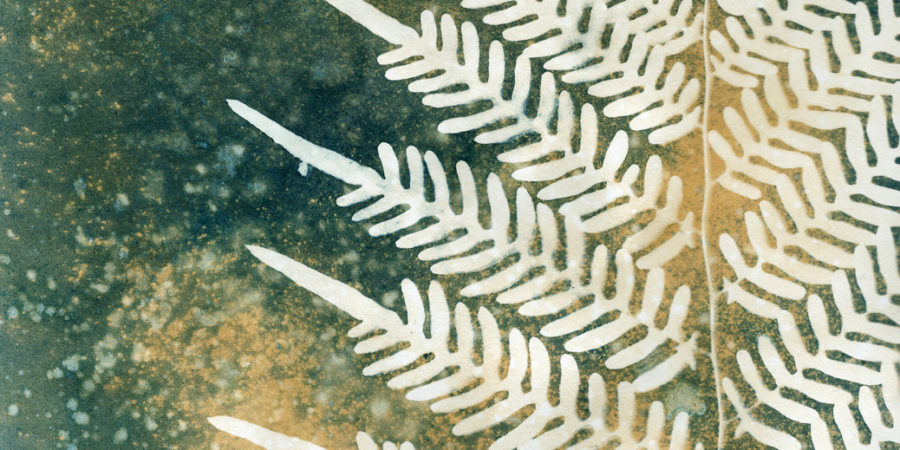
Now you will see how this comes together and relates to what I’ve been working on. The fern below is a Bracken Fern (Pteridium).

I LOVE the shape of this fern and a cool thing about it is it’s found on all continents but Antarctica and in all environments except desserts. I guess it doesn’t like extremes…I don’t either Mr. Bracken, I don’t either. It’s one of the oldest ferns with fossil records over 55 million years old!

Insert my fern picture rinsing in some water in my sink:

This image was initially created with cyanotype so it was a deeply beautiful blue. I forgot to take a photo of it because I was too excited to wait! I immediately added washing soda to the bath (not my bath, the ferns bath) and you can see how the color lifted and started creating some colorful yellow staining. (Washing soda is like bleach without the chlorine) Once it was the color I wanted, I rinsed it and took it outside to dry in the woods.

It was at this point that I started having some serious reservations about using the walnut stain on this image! I love the colors and could see this looking beautiful in a white frame with a white matte. I scanned this one so I could have a digital copy to do something creative with down the road!

Once it dried I brought it inside and used a container lid to pour some walnut dye inside in order to stain it.

The two images below are the final ones and I put them in frames to give you an idea of what they’d look like. The size is 9×12. Which one is your favorite?


Here is a picture of some cotton I dyed with the walnuts.

One last thing…
I also dyed some embroidery thread and a friend of mine (she makes natural wood earrings) and I are collaborating on a new line of earrings we will both sell at events!

I’m so excited and I’m still working on additional colors to the collection! So far I’ve used wild grapes, goldenrod and peach leaves. Stay tuned for that awesomeness!

This was a loooong blog so if you made it this far in one sitting just know that I am very proud of you! It took me a week of staring at a white screen (for 10 minutes at a time) for this to finally come together, so I am proud of myself, too. Thanks for reading! Comment below if you feel so led or if you have any questions!
I’ve been adding new work to my website and you can check that out HERE
~ Carmen